Testing painting materials is one of the most overlooked steps in creative work. Many artists rush straight into a project, only to discover problems halfway through. Colors behave differently than expected. Brushes feel awkward. Paper buckles or paint dries unevenly. These issues are frustrating, yet they are also preventable.
When you test painting materials first, you gain clarity. You understand how your tools interact. You also reduce uncertainty. Think of it like tasting a recipe before serving guests. Adjustments are easier early. Confidence grows before commitment.
Whether you paint for pleasure or professionalism, testing protects your time and vision. It allows you to focus on expression instead of damage control.
Why You Should Always Test Painting Materials First
Painting materials rarely behave the same way twice. Even familiar brands can vary between batches. Climate, surface texture, and technique all influence results. Therefore, testing painting materials is not optional if consistency matters.
Testing reveals drying time. It shows how pigments spread. It also exposes how surfaces absorb moisture. These details affect layering, blending, and finishing.
Moreover, testing reduces waste. You avoid ruining expensive paper or canvas. Mistakes become lessons rather than losses. Over time, this habit saves money and mental energy.
Understanding Paint Behavior Through Testing
Every paint has a personality. Some flow freely. Others resist movement. Testing painting materials helps you learn these traits.
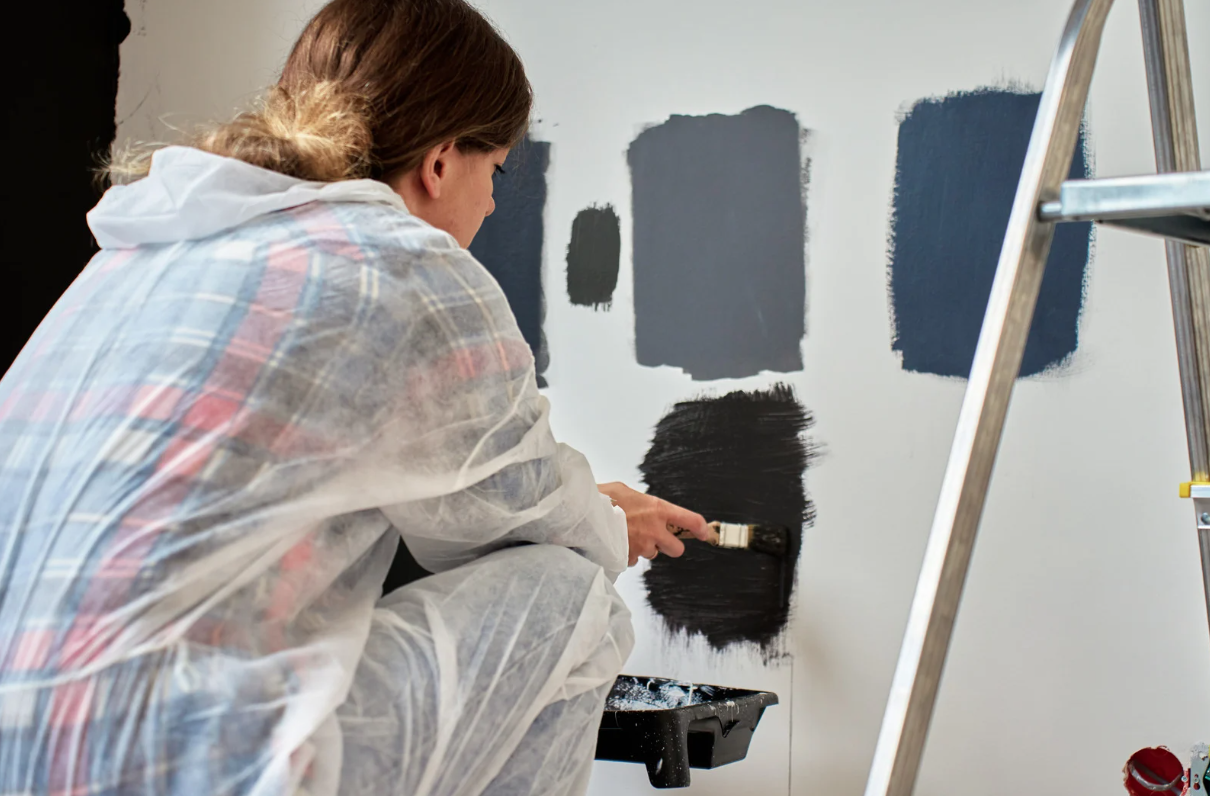
Apply small swatches on scrap material. Observe opacity and transparency. Watch how colors shift when dry. Some paints darken. Others lighten. This difference matters when planning values.
Additionally, test how paints mix. Two colors that look perfect separately may create mud together. Testing prevents unwanted surprises during your main work.
Paint behavior also changes with water or medium. Therefore, experiment with different ratios before committing.
How to Test Brushes Before Painting
Brushes influence control and texture more than many realize. A brush that feels right in the store may behave differently when wet.
Dip the brush in clean water. Test flexibility and snap. Then load it with paint. Observe how it holds pigment. Does it release smoothly or dump paint suddenly?
Testing painting materials like brushes reveals comfort issues early. If a handle strains your grip, fatigue appears quickly. If bristles spread too much, detail suffers.
Brush testing also helps match tools to techniques. Broad washes need different brushes than fine lines. Testing clarifies these choices.
Testing Painting Surfaces for Compatibility
Surfaces define how paint behaves. Paper, canvas, wood, and board all react differently. Testing painting materials always includes surface testing.
Paint a small area. Let it dry fully. Check for warping, bleeding, or uneven absorption. Some papers buckle easily. Others resist moisture better.
Texture matters as well. Rough surfaces create broken strokes. Smooth ones allow crisp lines. Testing ensures the surface supports your intended style.
If you plan layering, test that too. Some surfaces lift paint when reworked. Discovering this early prevents damage later.
Color Accuracy and Lighting Tests
Colors change under different lighting. A color that looks perfect under daylight may appear dull indoors. Testing painting materials in your working environment reveals these shifts.
Place test swatches near your workspace. View them at different times of day. Artificial lighting often alters warmth and contrast.
Testing under real conditions helps you choose colors confidently. It also prevents disappointment when finished work is displayed elsewhere.
Lighting awareness improves professional results significantly.
Testing Mediums and Additives
Mediums alter paint behavior dramatically. They affect drying time, gloss, and texture. Therefore, testing painting materials includes additives.
Mix small amounts of medium with paint. Observe changes in flow and finish. Some mediums increase transparency. Others thicken paint.
Drying time matters especially for layered work. Testing prevents rushing or smudging later.
Always label test swatches clearly. Memory fades faster than expected.
How to Test Layering and Drying Time
Layering requires patience and planning. Testing painting materials reveals how layers interact.
Apply a base layer. Let it dry fully. Add another layer on top. Observe lifting, cracking, or blending.
Drying time varies by paint type and environment. Humidity slows drying. Heat speeds it up. Testing prepares you for these variables.
Understanding layering behavior avoids muddy colors and damaged surfaces.
Testing for Adhesion and Durability
Some projects demand durability. Murals, furniture, or functional art need strong adhesion.
Test painting materials by scratching lightly after drying. Observe flaking or peeling. This test reveals long-term stability.
Sealing tests also matter. Apply varnish or sealant to a test area. Check for color changes or reactions.
Durability testing protects finished work from future damage.
Using Test Swatches as Reference Tools
Test swatches serve beyond preparation. They become references during the project.
Keep them nearby. Compare colors and textures as you work. This habit maintains consistency across large pieces.
Testing painting materials creates a visual library. Over time, you learn how specific combinations behave. This knowledge compounds with experience.
Reference swatches reduce guesswork and hesitation.
Testing Saves Time, Not Wastes It
Some artists skip testing to save time. Ironically, this choice often costs more time later.
Fixing mistakes mid-project takes longer than testing beforehand. Corrections interrupt flow and confidence.
Testing painting materials streamlines decision-making. Once testing is complete, execution becomes faster and smoother.
Efficiency grows when uncertainty disappears.
Adapting Testing Methods for Different Mediums
Different mediums require different testing approaches. Watercolor demands absorption tests. Acrylic needs adhesion tests. Oils require drying and blending tests.
Adjust testing methods accordingly. Do not assume one process fits all.
Digital painters test brushes and settings too. Even virtual tools benefit from experimentation.
Testing principles remain consistent across mediums.
How to Create a Simple Testing Routine
Testing does not need to be complex. A simple routine works well.
Use scrap materials. Label everything. Note ratios and conditions. Keep tests organized.
Spend ten to fifteen minutes testing before major projects. This habit quickly becomes second nature.
Consistency matters more than perfection.
Common Mistakes When Testing Painting Materials
One common mistake involves rushing tests. Drying time cannot be forced accurately. Allow full curing whenever possible.
Another mistake is testing only once. Repeat tests to confirm results. Variability exists.
Ignoring environment also causes errors. Test where you actually work.
Avoid these pitfalls for reliable insights.
Building Confidence Through Testing
Testing painting materials builds trust in your process. Confidence grows when you understand outcomes.
Instead of guessing, you act with intention. Decisions feel informed rather than hopeful.
This confidence improves creative freedom. You focus on expression, not fear of failure.
Over time, testing becomes empowering rather than tedious.
Conclusion
Testing painting materials before starting any project transforms uncertainty into clarity. It reveals how paints behave, how surfaces react, and how tools perform. More importantly, it protects your vision. When you test first, mistakes shrink. Confidence expands. Creativity flows without interruption.
Make testing a habit. Treat it as preparation, not delay. Your projects will thank you.
FAQ
1. How long should I spend testing painting materials?
Ten to fifteen minutes is usually enough for basic testing before a project.
2. Should I test materials for every project?
Yes, especially when using new supplies or working on important pieces.
3. What should I do if test results are inconsistent?
Repeat tests and adjust variables like water, pressure, or surface choice.
4. Can testing painting materials improve color accuracy?
Yes, testing reveals drying shifts and lighting effects that affect color.
5. Do professional artists still test their materials?
Absolutely. Professionals rely on testing to maintain consistent, high-quality results.