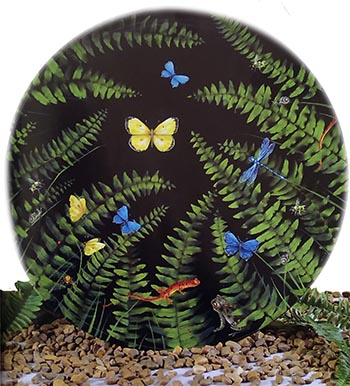
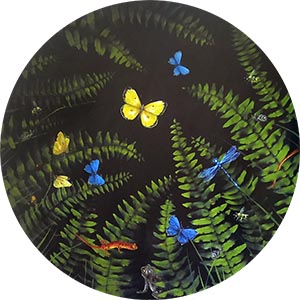
Create a dramatic, but super-easy fern background using natural fern fronds as a stencil, and then enrich the scene with your favorite insects and woodland creatures.
Materials

-
Western Metal Ware Primed Metal Shallow Plate, #17 (17″ dia.)
-
Plaid FolkArt Artists’ Pigments: Aqua, Asphaltum, Burnt Sienna, Burnt Umber, Cobalt Blue, Dioxazine Purple, Fawn, Green Umber, Hauser Green Light, Hauser Green Medium, Medium Yellow, Prussian Blue, Pure Black, Raw Sienna, Raw Umber, Red Light, Titanium White
-
Silver Brush Ruby Satin 1 /8M filbert grass comb (Series 2528S), #4 bright (Series 2502S); Ultra Mini #12/0 angular (Series 2406), #12/0 pointed round (Series 2400S), #20/0 script liner (Series 2407S), #2 designer round (Series 2431S); Wee Mop 1/8″, 3/16″, 1/4″, and 3/8″ mop (Series 5319S); Golden Natural #4 filbert (Series 2003S); assorted soft flat brushes
-
FolkArt Blending Gel Medium; ClearCote Acrylic Sealer, Matte (spray)
-
Elmer’s Craft Bond Spray Adhesive, Multi-Purpose
-
Krylon Fusion, Satin Black (spray paint)
-
Saral Transfer Paper, White
-
Masterson Art Products Sta-Wet Handy Palette
-
J.W. etc. UnderCover Acrylic Primer, Painter’s Finishing Wax
-
Heather’s Choice Final Coat, Satin (wipe-on varnish); Applicator
-
Miscellaneous: #0000 steel wool, #0000 white synthetic steel wool applicator, cotton swabs, fresh fern fronds (about 14), hair or embossing dryer, mechanical pencil, odorless thinner, soft paper towels, stylus, super fine wet/dry sandpaper or sanding film, tack cloth, tracing paper
Preparation
Note: Follow all manufacturers’ label instructions for proper product usage.
-
Apply a thin coat of UnderCover to the entire plate with a large flat brush. When dry, lightly sand and remove dust with a tack cloth.
-
Base the top side of the plate with Hauser Green Light. If desired, darken the outer few inches toward the edges of the plate with Hauser Green Medium. Roughly blend the colors where they meet for a smoother transition from dark to light. Let dry. Spray the surface with matte sealer. Dry thoroughly.
-
Trace and transfer the frond position pattern with white transfer paper. Trace individual creature patterns of choice on small pieces of tracing paper; patterns will be transferred as needed. Reserve to transfer later.
-
In an out-of-doors, wind-free location, spray the back side of the tray with Satin Black spray paint, following the manufacturer’s directions. Repeat as needed for complete coverage, especially in the rim area. Allow surface to dry thoroughly.
Painting: Stage 1
Create the ferns
-
Place fresh fern fronds facedown on paper towels in an out-of-doors, windless location. Spray the fronds with a light to medium coat of adhesive. Follow the manufacturer’s directions for temporary bonding. Let dry at least five minutes.
-
Position the sprayed ferns face side up (sticky side down) on the plate. Bend the fronds to conform to the curved pattern lines and press lightly along the stem to temporarily adhere them to the surface. Ferns may be lifted and repositioned as needed. Once satisfied with the composition of the ferns, clip back any fronds overhanging the edge of the plate.
-
Gently press individual leaflets to the plate. It is not necessary, or even desirable, that all areas of every leaflet adhere to the surface, since these lifted areas will add the illusion of ruffles and shadows in the fern design. However, ferns that do not in general adhere well, may be gently lifted, sprayed again with adhesive, dried, and reapplied. As you work, clean adhesive from hands with a paper towel and odorless thinner.
-
Still working out-of-doors, spray the green top of the plate and the adhered ferns with Satin Black, following the manufacturer’s instructions. Several very light coats, rather than one heavy coat, prevents paint buildup around leaflets. Maintain a spray pattern that is perpendicular to the surface, as spraying from low angles allows excessive color to drift under the leaflets. (Some drifting is unavoidable, and even desirable, as it creates airbrushed shadow effects.) Allow surface to dry thoroughly.
-
Remove the real ferns from the plate to reveal the green base paint fern pattern. Dispose of ferns. Clean hands with a paper towel and odorless thinner. Remove any excessive adhesive remaining on the surface of the plate with a cotton swab and odorless thinner.
-
Liberally spray the plate with matte sealer. Dry thoroughly.
Perfect the ferns
Note: Blending Gel Medium will be referred to as “Gel” throughout the painting instructions.
-
With a #4 filbert and Hauser Green Light or Hauser Green Medium, perfect some of the green leaflet shapes. Work randomly about the design in order to avoid overworking. Note: Perfection of every leaflet is not necessary.
-
Enhance some leaflets with Green Umber shading and/or brush-mixed Hauser Green Light + Medium Yellow + Titanium White highlights. Blend shadows and highlights with a bit of Gel or base paint. Once again, work randomly to avoid overworking. Sharpen leaflet edges, as needed, with the clean, damp, bright “eraser” brush, or damp cotton swab. Let dry, and then spray liberally with matte acrylic sealer. Dry thoroughly.
-
Stroke in frond stems with the #2 designer round or the chisel edge of a flat brush and Raw Sienna. Shade parts of some stems with Raw Umber, and highlight with brush-mixed Raw Sienna + Medium Yellow + Titanium White. To promote a more ruffled effect, occasionally “erase” the stem line with the clean, damp bright brush where it falls over a leaflet. Let dry.
-
Create delicate veins on all individual leaflets with the #20/0 script liner and inky, brush-mixed Green Umber + Raw Umber (+ Pure Black for very dark leaflets).
-
Use a fully loaded #2 designer round to freehand random grass blades of Hauser Green Light or Hauser Green Mediym over the ferns. With the clean, damp, bright brush, “erase” parts of some blades that fall over fern leaflets to create the illusion of the blade being behind the fern. Let dry, and spray liberally with matte sealer. Dry thoroughly.
Painting: Stage 2
Insects and creatures technique
Note: Select brushes of appropriate size and style for each task. Use small flats, filberts, or angulars for most painting. Reserve liners and rounds for detailing. Use a clean, damp, bright brush as an “eraser” to sharpen shapes or lift out mistakes. Use tiny mops to blend Gel/color. Prevent surprise lifting of paint that appears dry. Force-dry Gel/paint with a dryer before adding successive layers of Gel and paint.
Apply a “barrier” coat of matte spray at any time. This allows for totally fearless application of more layers, since undesirable results may simply be removed with a damp cotton swab or paper towel without disturbing the underlying layers.
-
Transfer insects and creatures of your choice over the fern background with white transfer paper and a stylus. Remove transfer lines that fall over ferns when you wish to position the creature behind the fern.
-
Undercoat insect bodies (not wings) and creatures with Titanium White. Glowing color is dependent upon very light value undercoats. Leave transfer lines exposed.
-
Glaze the undercoated creatures multiple times with darker colors that have been made transparent with Gel. Build transparent layers gradually. An area may be lightened again at any interval, but must once again be glazed with a very transparent darker color to counter a “milky” look. Dry layers of Gel/paint thoroughly between steps.
-
Repeat the Gel and paint layers infinite times to brighten highlights/ deepen shading, or add color. There is no “correct” amount of Gel to use. Use more, or less, depending upon the amount of open time and/or transparency you desire. Gel dries to an invisible film. Keep layering.
Colorize insects and creatures
-
Yellow butterflies. Overpaint wings with Medium Yellow + Titanium White, and body and antennae with Fawn. Dry. Repaint wings with Medium Yellow + a touch of Titanium White. Dry. Add Pure Black + a touch of Titanium White markings (Fig. 1). Dry. Moisten the surface with Gel and shade with Burnt Sienna. Dry. Highlight with Titanium White. Tint with Hauser Green Light + Gel (Fig. 2). Dry. Add veins of Burnt Sienna or Titanium White. Add spot markings. Add Raw Umber stripes to body. Fuzz body with a 1/8″ filbert grass comb and Fawn + Medium Yellow + Titanium White. With the same mix, highlight the antennae. Add Pure Black eyes and highlight with Titanium White (Fig. 3).

-
Blue butterflies. Overpaint wings with Titanium White + Aqua + a touch of Prussian Blue. Overpaint body and antennae with Fawn (Fig. 4). Dry. Moisten the surface with Gel, and shade with brush mixes of Cobalt Blue or Prussian Blue + Pure Black + a touch of Titanium White. Dry. If desired, tint with Dioxazine Purple + Gel (Fig. 5). Add Pure Black and Red Light markings. Vein the wings and add edge markings with Titanium White. Finish the body and antennae in the same manner as for the yellow butterflies (Fig. 6).

-
Damselfly. Overpaint body with Titanium White + Aqua + a touch of Prussian Blue and wings with Titanium White + Gel (Fig. 7). Dry. Moisten the surface with Gel, and shade body with Prussian Blue + Pure Black and/or Dioxazine Purple. Highlight with Aqua + Titanium White (Fig. 8). Moisten the wings with Gel, and highlight with Aqua + Titanium White. Dry. Add Titanium White veins and Pure Black markings. Tint with Dioxazine Purple + Gel (Fig. 9).
-
Bees. Overpaint body, legs, and antennae with Medium Yellow. Dry. Add Pure Black eyes and stripes (Fig.10). Dry. Moisten the surface with Gel. With a 1/8″ filbert grass comb, add fuzzy Burnt Sienna + Gel shadows along bottom of body and Titanium White highlights along the top (Fig.11). Dry. Use the #12/0 angular with Titanium White + Medium Yellow + Gel to create wings. Dry. Add Titanium White veins (Fig. 12).
-
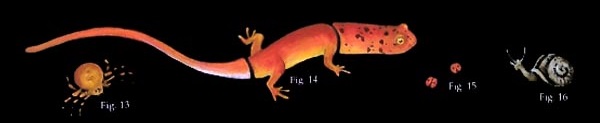
Spider. Overpaint body, head, and legs with Medium Yellow. Shade with Burnt Sienna + Gel. Highlight with Medium Yellow + Titanium White. Add Burnt Sienna back markings. Freehand a web with inky Titanium White and the #20/0 script liner (Fig. 13).

-
Salamanders. Overpaint with bright orange (Medium Yellow + Red Light). Highlight stomach with Titanium White. Moisten surface with Gel, and shade top of body, legs, and around eye with Burnt Sienna. Tint white stomach with Medium Yellow. Highlight toes, mouth, and eye bulges with Medium Yellow + Titanium White. Dry. Add Medium Yellow eye with a Pure Black pupil and Titanium White highlight. Freehand Pure Black spots (Fig. 14).
-
Ladybugs. Freehand Red Light ladybugs. While wet, highlight with Medium Yellow. Dry. Add Pure Black heads, antennae, and markings (Fig. 15).
-
Snails. Overpaint with Fawn. Moisten surface with Gel, and shade with Raw Umber. Highlight with Titanium White (Fig. 16).
-
Toad. Overpaint body with Fawn and the eye iris with Medium Yellow. Add the pupil with Pure Black. Dry. Moisten surface with Gel, and shade body with Raw Umber and/or Burnt Umber. Shade eye with Burnt Sienna (Fig. 17). Dry. Remoisten surface with Gel, and highlight body with Titanium White and the eye with Medium Yellow + Titanium White. Dry. Add Titanium White eye highlight (Fig. 18). Moisten surface again with Gel, and create blotchy markings of Titanium White, Burnt Umber, and Raw Umber. Dry. Tint with Asphaltum + Gel (Fig 19).

Finishing
-
When thoroughly dry, wipe the plate with the tack cloth. Finish the tray with twenty or more coats of Final Coat wipe-on varnish using the applicator. Note: Force-dry the varnish with a hair dryer to prevent any milky streaking. If streaking should occur, wipe the area with a scant amount of wet varnish and immediately dry with the hair dryer. To remove imperfections in later coats of varnish, buff the surface with #0000 steel wool using moderate pressure. Dry and then dust with the tack cloth before each successive coat of varnish.
-
Let the varnished plate cure over night. Lightly burnish the entire surface with #0000 steel wool. Thoroughly remove any residue with the tack cloth.
-
Apply a liberal coat of Painter’s Finishing Wax using heavy pressure and a white synthetic steel wool applicator. Once the wax is hazed, buff the surface with soft paper towels. For best results, frequently change to a clean towel. Apply a second coat of wax using the same process.
Leave a Comment