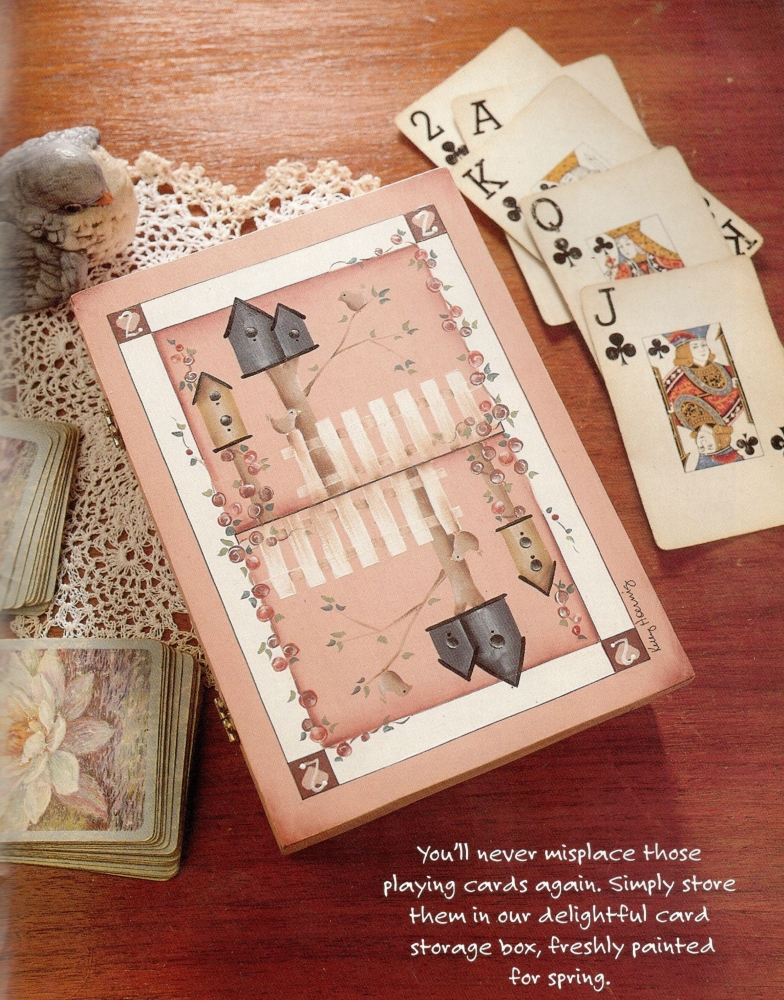
You’ll never misplace those playing cards again. Simple store them in our delightful card storage box freshly painted for spring.
Rating
Medium: acrylics on wood
Materials
- Wayne’s Woodenware card box
- DecoArt Americana Acrylics
- Brushes: Loew-Cornell Series 7300 Nos. 2, 4, and 16 shader; Series 7350 No. 1 liner; Series 7500 No. 6 filbert; and Series 798 3/4” flat glaze
- Sandpaper
- Tack cloth
- Tracing paper
- Super Chacopaper
- Loew-Cornell Double Ended Stylus (DES)
- 3M Scotch Magic Tape
- Heart stencil
- Palette
- Permanent black marker
- DecoArt Americana Matte Varnish
Preparation
Step 1. Sand the box on all sides and wipe sanding dust with the tack cloth. (I don’t seal my wood before painting, but you can stain or seal as desired. Be sure to sand lightly again after sealing.)
Step 2. Base entire piece with BF. Trace pattern onto tracing paper and transfer onto surface using the stylus. Tape off outer border and base with
several coats of WW. Remove tape, then base in corner squares with RR. When dry, paint or stencil in hearts with BF. Paint the number “2” at each corner using WW and dot ends with the stylus.
Painting
Step 1. Base single birdhouses AG. Highlight center with WW. Shade edges and under roof with BU. Perch, roof, and base are BLK. Holes are BLK with a WW highlight.
Step 2. Base double birdhouses DMB. Highlight center and smaller house edge with DMB + WW. Shade BLK behind smaller house. Perch, roof, and base are BLK. Holes are BLK with a WW highlight.
Step 3. Base poles, trunks, and branches MT. Pull the thin branches out by staying on the tip of your brush. Shade trunks BU and highlight with WW, referring to the color photo for placement. Allow to dry completely.
Step 4. Tape off bottom and top edge of fence. Using the No. 2 shader, pull the horizontal braces with MT. With the No. 4 shader, pull each picket from top to bottom with WW. Drybrush with MT to shade each vertical picket. Deepen shading with BU under the birds. Shade the horizontal brace with BU on either side to give the fence more of a three-dimensional look.
Step 5. Base both birds with MT. Shade left side with BU and highlight right side with WW. Tail is three comma strokes of MT. Beak and feet are AG + RR. Highlight beak of bird by trunk of tree with WW. Use the stylus and BLK to apply a dot for eye.
Step 6. Use the No. I liner to paint roses with the following color variations: base SF and shade CT; base CT and shade RR; base RR and highlight SF. Highlight all roses with WW, and then pull WW swirls around center of each rose. Paint vines MT, then apply BU shadows in a random manner.
Step 7. Using the No. 6 filbert, place leaves in a random manner with various shades of LA and AT.
Step 8. Shade all along bottom edge of white border with RR, making sure not to touch into the WW. Avoid placing any shading on fence. Shade comers of box with RR to darken. Allow to dry completely.
Step 9. Complete all linework using the permanent black marker.
Finishing
Sign your name and finish with two coats of matte varnish.
Palette
| DecoArt Americana Acrylics | Abbreviation |
|---|---|
| Antique Gold | AG |
| Antique Teal | AT |
| Base Flesh | BF |
| Burnt Umber | BU |
| Crimson Tide | CT |
| Deep Midnight Blue | DMB |
| Lamp (Ebony) Black | BLK |
| Light Avocado | LA |
| Mink Tan | MT |
| Rookwood Red | RR |
| Shading Flesh | SF |
| White Wash | WW |
I see, that https://vjd.ius.temporary.site/website_7a03333c have unique
and fresh articles. I know it’s hard to write articles manually everyday, but you guys rock!
Thank you for making these projects available and free of cost. I do enjoy looking at all of them, however, I discovered that there does not seem to be any patterns for tracing with the projects. Why is that? Did I miss something? Your help is greatly appreciated.
A long time previous subscriber,
Kate
Hey Kate,
Unfortunately the pattern sheets are way too big to be scanned by our current equipment. We will try to find a solution and upload the patterns as soon as we can.