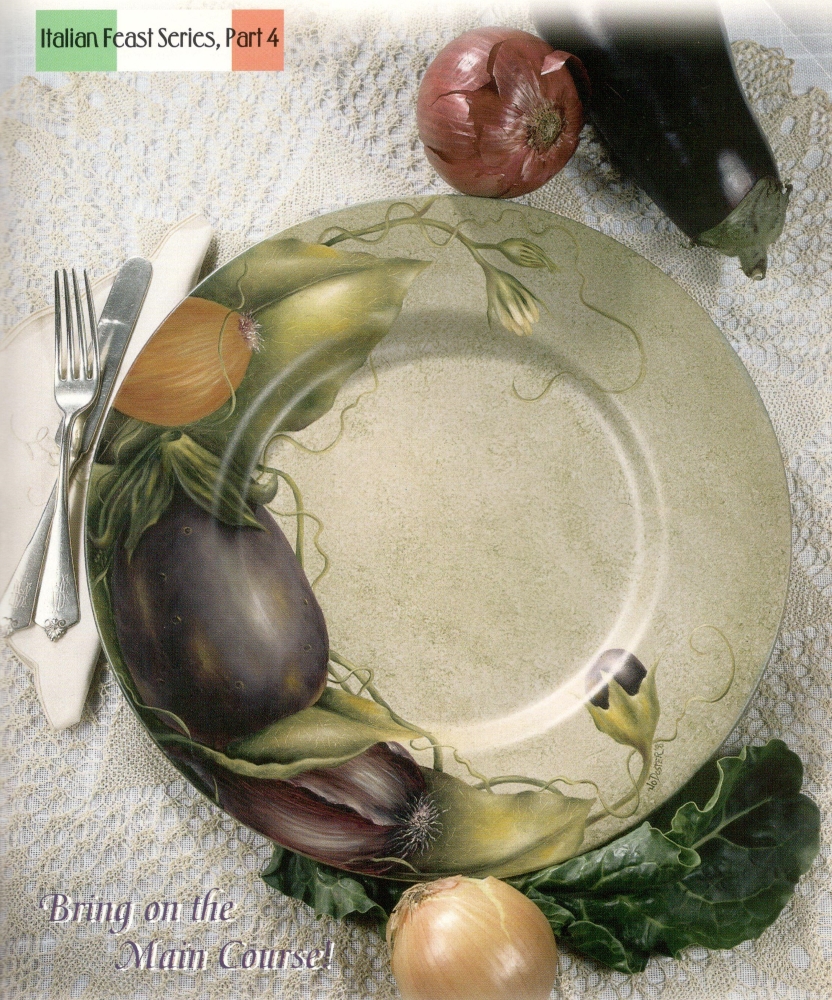
Bring on the main course!
Materials
Palette
- Delta Cercuncoat Acrylics English Yew Green (EYG)
- Mudstone (MU)
- Daler-Rowney Artists’ Oil Colours Greenish Umber (GU)
- Ivory Black (IB)
- Titanium White (TW)
- Yellow Ochre (YO)
- Rembrandt Oils Burnt Carmine (BC)
- Cinnebar Green Light (CGL)
- Transparent Oxide Red (TOR)
- Shiva Permasol Transparent Oil Colors Permasol Black (PBLK)
- Martin/F. Weber Permalba Oil Colors Indian Yellow (IY)
Brushes
Loew-Cornell
- Series 7350 No. 2/0 liner
- Series 7450 Nos. 4, 6, and 8 chisel blender
- Small filbert mops
Other Supplies
- Barb Watson’s Brushworks 14″ dia. metal plate
- Tracing paper
- White graphite paper
- Stylus
- Palette paper (for acrylics)
- Oil palette
- Palette knife
- Sponge
- Paper towels
- Dick Blick Wipe Out Tool
- Krylon Matte Finish Spray (No. 1311)
- Winsor & Newton Blending & Glazing Medium
- Satin varnish of choice
Preparation
 1. Basecoat the entire plate MU and let dry. Wet the plate with water, then lightly sponge with EYG to achieve a mottled appearance. Let dry.
2. Trace the pattern onto tracing paper and transfer onto the plate using white graphite paper and the stylus.
Mixtures
Parchment (PA) = YO + TW + IB Neutral Gray (NG) = IB + TW
Painting
Note: Refer to the value placement diagram (on page 54) for the following steps. Glazing will be applied after all design elements are complete.
1. Leaves.
Highlight value = PA Light value = CGL Medium value = CGL + NG Dark value = GU Accent = YO – BC
Set up the colors according to the value placement diagram or paint like you would any basic leaf. While still wet, pull out veins with the wipe out tool. Allow to dry.
2. Yellow onion. Use IB and TW to mix three values of neutral gray. Paint the onion following the value placement diagram and allow to dry. Use the liner to scumble some TOR on the top of the onion, then pull out hairs with PA.
3. Eggplant. Highlight value = PA Light value = NG Medium value = BC + NG Dark value = GU + BC
Set up the colors according to the value placement diagram. While still wet, add splotches of CGL, then soften with the mop. For the “pox” marks, brush mix YO + NG + PA and place a small circle for each mark. Fill in the marks with the Dark value. Allow to dry.
4. Bermuda onion.
Base value = BC Highlight value = PA – TW Medium value = BC + PA + NG Dark value = BC + IB
Basecoat the onion BC. While still wet, place the Medium value in the light areas. Come back on top with PA, then streak the entire onion using the chisel edge of the brush. Base in the top of the onion BC. Shade with BC + IB, add PA, then use the liner to pull out hairs. Deepen the shading under the crack with the Dark value. Allow to dry.
5. Eggplant top. Apply stripes of GU, fill in with the Medium leaf value, then chop blend. Add CGL to the light areas, then apply highlights with PA. Deepen the shaded areas with the Dark eggplant value. Accent with YO.
6. Blossom. Apply YO at the base of the petals. Brush mix YO + PA and apply to the top of the petals. Streak together using the chisel edge of a brush. Add highlights with TW + PA.
7. If desired, spray the plate with matte finish spray to help speed up the drying time. The plate must be completely dry before glazing.
8. Glazing. Note: Follow manufacturer’s instructions for using the Blending & Glazing Medium. Begin with the Light values in the light areas first, mop softly, then apply the Accent values and mop. Refer to the photo for exact placement of colors as you work. Evaluate the project at this point to determine whether you need to glaze the dark areas (sometimes this is not necessary). If needed, glaze the dark areas with the Dark values and PBLK. Glaze the yellow onion with TOR. Reinforce the highlights with PA, then add streaks of YO and IY.
9. Accents and details. Apply accents around the entire plate with IY and TOR to tie the design elements together.
Use the green mixtures from your palette to apply the vines and squiggles throughout the design.
Finishing
Sign the plate and allow to dry. Apply satin varnish following manufacturer’s instructions, allowing adequate drying time between applications.
Leave a Comment