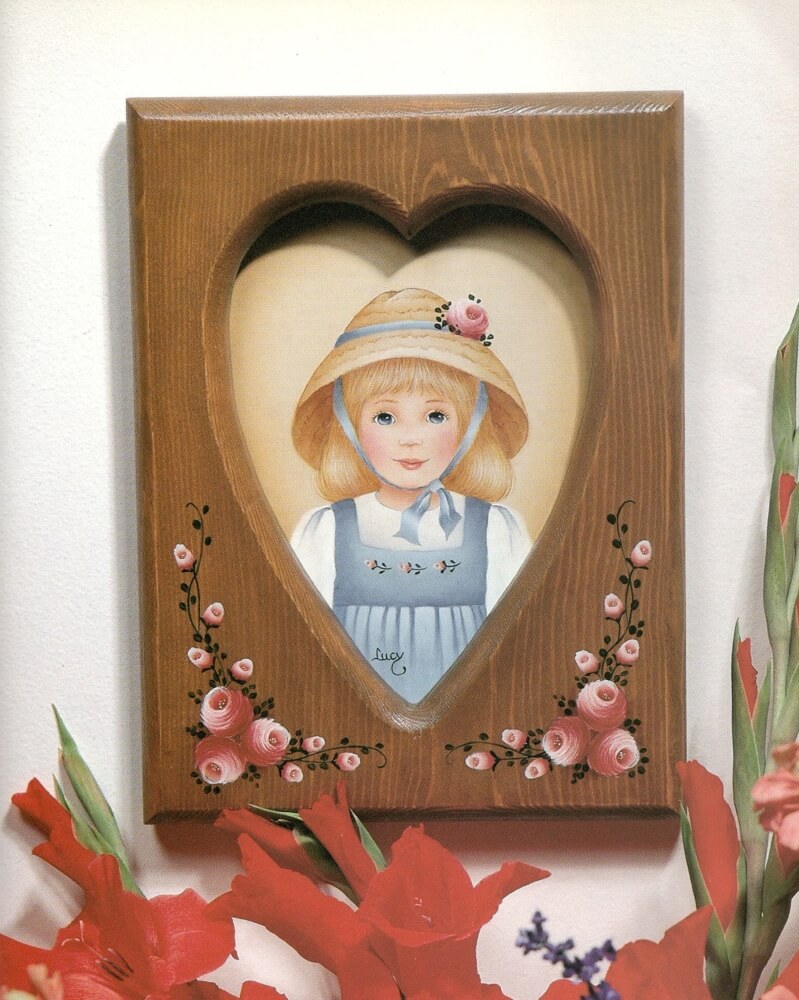
Picture Perfect! Practice the technique of painting portraits following our step-by-step color worksheet shown below.
Rating
Medium: acrylics on wood
Materials

- The Paint Box wooden panel and frame
- Delta Ceramcoat Acrylics
- Brushes: Dove Brush Mfg. Series 102 Nos. 8, 12, and 16 shader; Loew-Cornell Series 7520 1/4″ filbert rake; Bette Byrd Series 500 No. 10/0 scroller; Ann Kingslan No. 1 mop; and Suzie’s Pit-I-Pat mop
- J.W. etc. Acrylic Wood Stain in Fruitwood
- Fine sandpaper, 220 grit
- Tack cloth
- Soft cloth
- Tracing paper
- Transfer paper
- Stylus
- Palette paper
- Pencil
- J.W. etc. Right-Step Water Base Clear Varnish, Matte
Preparation
Step 1. Sand surfaces and remove sanding dust with the tack cloth.
Step 2. Stir the stain until it is mixed well. Using a soft cloth, rub stain onto the frame and then wipe off excess with another soft cloth. Allow to dry. Sand lightly, tack, and apply another layer of stain, again wiping off excess.
Step 3. Base the panel FT. Sand and wipe off sanding dust, then apply a second coat of paint.
Step 4. Trace patterns onto tracing paper and transfer only the main pattern lines on panel and frame using the stylus.
Painting
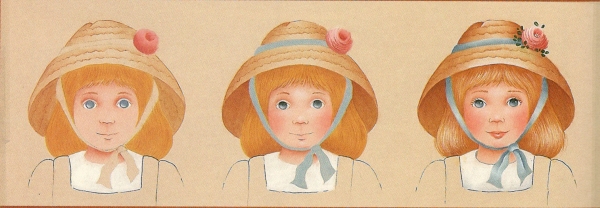
Step 1. Basecoat face FL, hair EG, hat FT, jumper DG, blouse LI, and roses NC.
Step 2. Transfer the details onto surface, with the exception of hat, ribbon, and eyelashes.
Step 3. Outline the eyes, nose, smile line, and middle area of the lower lip line with thinned BS. (Do not outline the top lip.) These lines will be permanent, so use a very fine liner and your lightest touch. The eyebrows are wispy lines of RS + BS. Allow linework to dry, then carefully erase the graphite lines if necessary. Shade under bangs, above eyelids, under nose and bottom lip, and under chin with CA. Also shade next to the inside corners of the eyes. Do not carry the color any lower than the bottom of the eyes before fading out. Highlight between the eyebrows, top of nose, under eyes, and tip of chin area with LI. (These are all flip-flop sideloads.) Do not highlight the eyelids. Checks and lips are PE. To paint cheeks, wet the cheek area slightly with water and then apply a sideload of paint, working your way out from the edge of the face. Mop to soften. Slightly blush the bottoms of nose and chin with PE as well. Pinch the No. 10/0 scroller flat to softly fill in the lips with thinned PE. Add a LI highlight to the middle area of lower lip.
Step 4. The outside corners of eyes are filled in with LI. The iris is painted LB. Sideload brush with LI and highlight the bottom left area of iris. Sideload brush with BLK and paint pupil, letting the bottom edge fade out about halfway down the iris. Highlight in upper right area with a small dot of
LI. Outline the top of eye again and line in the eyelashes using BU.
Step 5. Using equal parts RS + BS,complete all linework for hat, including the outside edges. Shade edges and above detail lines with ST, and then with the RS + BS mix. Highlight with LI. Thin the mix and wash the inside area of hat. Repeat to strengthen color, if needed. Shade with BS.
Step 6. Lightly rake a thin mix of RS + BS through hair. Sideload brush and shade top of head, behind shoulders, and on both sides of ribbon (refer to color photo for placement). Rake thin LI highlights in the middle of the bangs and on the lower sections that puff out. Line in a few stray hairs on the sides and also on the tips of the bangs with the RS + BS mix.
Step 7. Base hat band and bow DG. Shade with an equal mix of LB + NI. Highlight with LI.
Step 8. Shade blouse area above jumper and the pleats at the shoulders with NI. Also paint a thin line at the top of the neck opening.
Step 9. For the jumper, use equal parts NI + LB to shade straps at the top of the shoulders, down the sides, above the pleated area, and the pleats. Highlight with LI between the pleats and behind the rose trim.
Step 10. Place the frame over the insert and lightly pencil in the heart outline. Using ST, shade edges of the heart shape.
Step 11. For the roses, shade the bottom and inside of each cup with GR. Rake thinned LI from outside left to about two-thirds of the way across. Repeat the same technique working from the right side, this time with GR + (BC). Make some liner strokes with these same colors to strengthen the lights and darks. Deepen shading at the bottom and inside of each cup with the GR + (BC) mix. Add some tiny LI dots to the inside of each cup. The buds are shaded with the GR + (BC) mix and highlighted with LI (do not rake on color). Complete the leaves and stems with DFG. Allow to dry thoroughly.
Finishing
Finish with three coats of varnish, allowing time to dry between each application.
Color Worksheet
Palette
| Delta Ceramcoat Acrylics | Abbreviation |
|---|---|
| Black | BL |
| Black Cherry | BC |
| Burnt Sienna | BS |
| Burnt Umber | BU |
| Cayenne | CA |
| Dark Forest Green | DFG |
| Dolphin Gray | DG |
| Empire Gold | EG |
| Flesh Tan | FT |
| Fleshtone | FL |
| Gypsy Rose | GR |
| Liberty Blue | LB |
| Light Ivory | LI |
| Nectar Coral | NC |
| Nightfall | NI |
| Persimmon | PE |
| Raw Sienna | RS |
| Spice Tan | ST |
Leave a Comment