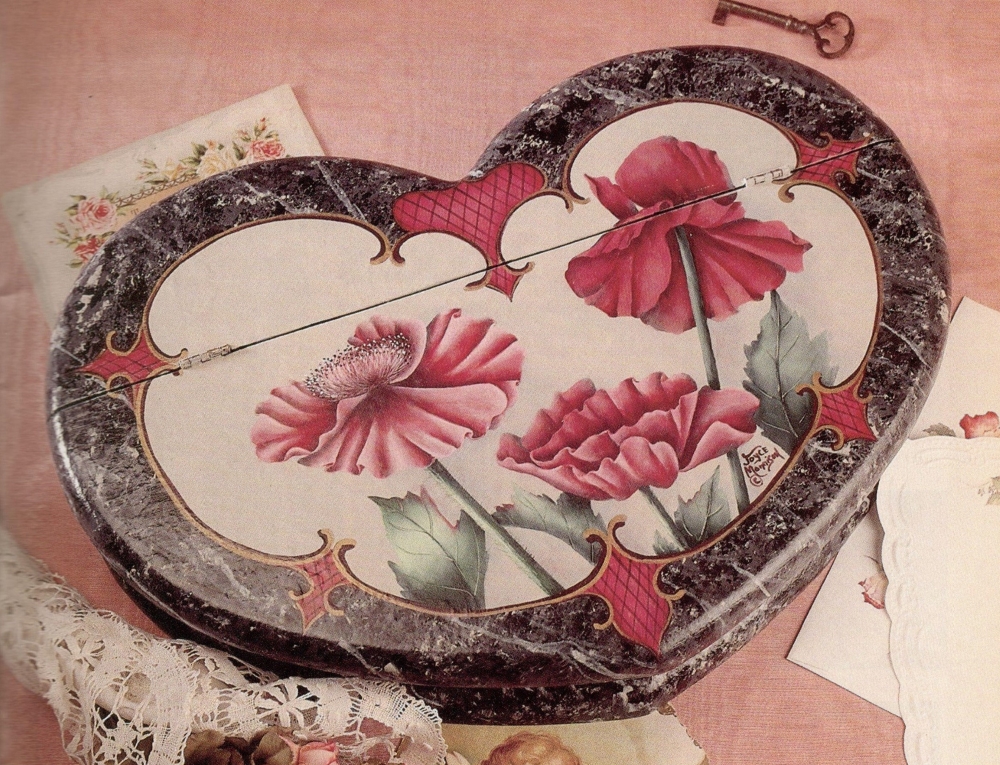
 Add a touch of the Orient to your home with this extraordinary poppy heart jewelry Sox a versatile piece which can Se displayed in any room.
Rating
Medium: acrylics on wood
Materials
- Allen’s Wood Crafts heart box, No. B501
- Deco Art Americana Acrylics
- Deco Art Dazzling Metallics
- Brushes: Silver Brush Limited Series 2002S Nos. 2, 4, 6, 8, 10, and 12 bright (flat); Series 2007S No. 1 script liner; and a sponge brush
- Plaid Faux Finish Marbleizing Kit in Black Onyx, No. 30055 (includes FolkArt Acrylics in Licorice, Charcoal Gray, and Platinum Gray; plus extender, thickener, sponge, and feather)
- Fine sandpaper
- Tack cloth
- Tracing paper
- White transfer paper
- Stylus
- Masking tape
- Wet palette
- Palette knife
- Plastic foam plates
- Paper towels
- Paste wax
Preparation
Step 1. Basecoat the entire box with Licorice acrylic. Allow to dry. Sand and wipe dust with the tack cloth. Apply a second coat of paint and allow to dry for 24 hours.
Step 2. Squeeze out three circles of Licorice, Charcoal Gray, and thickener and then two circles of extender in a vertical line onto a foam plate. Gently roll plate from side to side to mix colors. Wet sponge from kit and then squeeze dry. Tear irregular pieces from the face of the sponge and dip tom side into the color mixture. Starting at the left-hand corner, place sponge against surface and dab, twist, and then blot to apply color over entire background area. Keep color clean. If it gets muddy, wash out sponge and reload.
Step 3. Apply one teaspoon of Platinum Gray, one teaspoon of thickener, and two teaspoons of extender onto a clean plate in the same manner as for color in Step 2. Roll together but do not mix well. Run the feather from kit through the mixture, pulling it diagonally across the project surface and twisting it to paint wide and thin vein lines.
Step 4. Trace entire pattern onto tracing paper, and then transfer onto the surface. Basecoat center area (avoiding poppies design) with two applications of Platinum Gray. Paint the border inset shapes with two applications of BB.
Palette
| Deco Art Americana Acrylics | Abbreviation |
|---|---|
| Baby Pink | BP |
| Black Forest Green | BFG |
| Black Plum | BP |
| Blue Mist | BM |
| Boysenberry Pink | BP |
| Burgundy Wine | BW |
| Deep Burgundy | DB |
| Deep Teal | DT |
| Holly Green | HG |
| Midnight Green | MG |
| Pineapple | PI |
| Titanium (Snow) White | TW |
| Deco Art Dazzling Metallics Glorious Gold | GG |
Painting
Note: To basecoat, apply one smooth, solid application of color. Thin paint to a wash consistency before applying to surface. Shade using a wet flat brush gently blotted on a paper towel and sideloaded with creamy consistency paint. The first shading color covers the largest area. The second shading color is applied over the first shaded area but covers less space. You should be able to see both colors. The third shading will cover even less space than the first two shadings and is usually applied at points where three objects meet to form a triangle or crescent shape.
Step 1. Background leaves and stems. Basecoat with a wash of DT. Sideload with creamy consistency DT for the first shading color and creamy consistency BFG for second shading color. Sideload with thin, creamy consistency BM for the highlight.
Step 2. Middle ground leaves and stems. Basecoat with a wash of BFG. Sideload with creamy consistency BFG for the first shading and creamy consistency MG for second shading color. Sideload with thin, creamy BFG + PI (1:1) for the first highlight color and thin, creamy PI for second highlight color.
Note: Highlights are the lightest area of an object, where the light is strongest, or where the lightest value of color appears. The position of an object’s light source will determine its shape. Place it on the edge and it will make a straight petal; place it in the middle and it will bend a petal. Sideload brush with a thin, creamy consistency of paint and blend on the surface. The first highlight will cover a larger area than the second. You should be able to see both colors or values. The third highlight is applied to those petals which would be directly hit by the light.
Step 3. Foreground leaves and stems. Basecoat with a wash of HG. Sideload with creamy consistency HG for the first shading color, creamy consistency BFG for the second shading color, and creamy consistency MG for the third shading color. Sideload with a mix of thin, creamy consistency HG + PI (1:1) for the first highlight color and thin, creamy consistency PI for the second highlight color.
Step 4. Background and middle ground poppy. Basecoat with a wash of DB. Sideload with creamy consistency DB for the first shading color and creamy consistency BP for the second shading color. Sideload with thin, creamy consistency BB for the first highlight color and thin, creamy consistency BB + TW (1:1) for the second highlight color on the middle ground poppy.
Step 5. Foreground poppy. Basecoat with a wash of BW. Sideload with creamy consistency BW for the first shading color, creamy consistency DB for the second shading color, and creamy consistency BP for the third shading color. Sideload with thin, creamy consistency BB for the first highlight color; thin, creamy BB + TW (1:1) for the second highlight; and thin, creamy BPK + TW (1:1) for the third highlight.
Step 6. Centers. Paint the stamen lines using the No. 1 script liner loaded first with ink-like consistency BP, then BW, then BB, and finally BPK. Add dots using BP and TW + BP (1:1).
Step 7. Accents. Tie the painting together by applying touches of color from one object to another. Sideload with a wash of DT and apply to the dark left side of petals, leaves, and stems. Sideload with Charcoal Gray to add shadow. Add faint glazes of the poppy colors to the shadows.
Finishing
Step 1. Use ink-like consistency BFG to pull the leaf veins. Add highlights to veins in a random manner using ink-like consistency PI.
Step 2. Load the No. I script liner with ink-like consistency BP to paint the comma stroke border and cross-hatching designs. Come back with GG to make strokes over the BP strokes. Offset the gold strokes a little so that the darker strokes will still show. Allow to dry.
Step 3. Apply two coats of satin varnish. Apply paste wax to the rim and bottom of lid to help keep the lid from sticking.
Greetings! This is my first comment here so I just wanted to give a quick shout out and say I really enjoy reading your articles.
Can you suggest any other blogs/websites/forums that deal with the same subjects?
Thank you!
Thank you, Will!
We are sure you’ve heard about bhg.com 🙂
For other websites on the same topic – try Google, you will definitely find what you need…
I’m truly enjoying the design and layout of your own site.
It’s an extremely easy about the eyes that makes it much more pleasant for me to come here and visit
more frequently. Would you hire out a designer to make
your theme? Outstanding work!