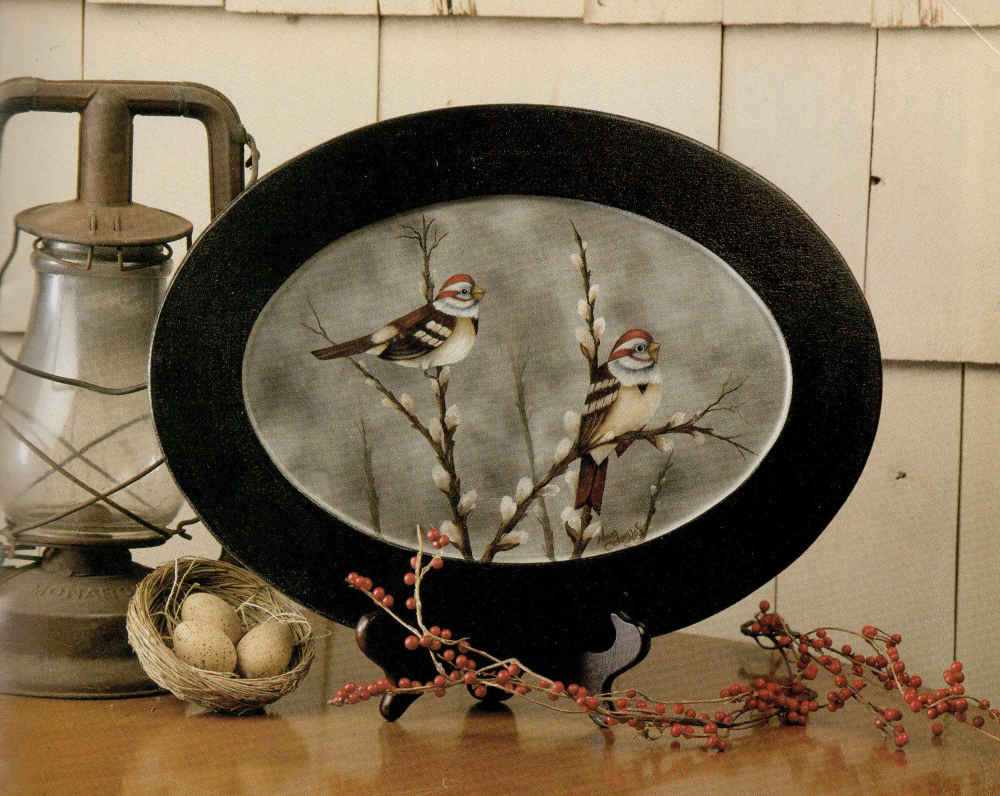
Smoke gets in your Eyes. Our designer chose to paint these beautifully marked tree sparrows on a background marbled with smoke. The smoked technique produces a wonderful textured look which is very easy to create.
Rating:
Medium: acrylics and oils on wood
Materials

- The Paintin’ House oval wooden plate, 12” x 16”
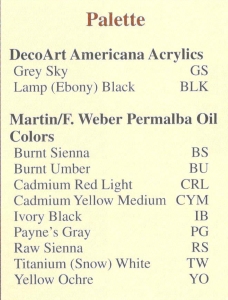
- DecoArt Americana Acrylics
- Martin/F. Weber Permalba Oil Colors
- Brushes: Loew-Cornell Series 7300 Nos. 2 through 8 shader, Series 7350 No. 1 liner, Series 2014 No. 4 round scumbler; 2” roller sponge brush
- DecoArt Americana Wood Sealer
- Fine sandpaper
- Tack cloth
- Candle
- Old silverplated tablespoon
- Tracing paper
- White transfer paper
- Stylus
- Krylon Matte Spray No. 1311
- Palette knife
- Disposable palette
- Soft paper towels
- Martin/F. Weber Turpenoid
- Container for turpenoid
- J.W. etc. Right Step Clear Matte Varnish
Preparation
 Step 1. Sand the entire tray thoroughly and wipe with the tack cloth to remove sanding dust.
Step 2. Seal tray with wood sealer and the 2” roller sponge brush. Allow to dry and sand again. Wipe with the tack cloth.
Step 3. Using the roller brush, paint the inside of the tray with two coats of GS. Allow to dry between each application. Continue rolling the brush until you achieve an eggshell finish.
Step 4. Paint the border and back side of the tray with two coats of BLK using the roller brush. Allow to dry between coats.
Smoked marbled background
Step 1. Light candle and allow to burn for a few minutes.
Step 2. Hold the scooped side of your old spoon over the flame and allow it to gather carbon from the flame.
Step 3. After the spoon is coated black with carbon, hold the spoon over the flame until you see a steady stream of smoke rising above the candle. Move the tray over this stream of smoke and allow the smoke to adhere to the surface of the tray. After you have gotten the desired look, spray immediately with the matte spray as the carbon will smudge if touched. Be careful not to handle surface until it has been sprayed.
Step 4. Trace pattern onto tracing paper and position on the tray. Slip transfer paper under the pattern and transfer the design using the stylus.
Painting
Note: The tree sparrow is best identified by the large black spot in the center of its breast. Note that it also has a reddish cap and two white wing bars, which is another of its identifying marks.
Step 1. Prepare the following two mixes: Light Grey (LG) = TW + PG and Warm White (WW) = TW + RS, which will be used in the following steps.
Step 2. Paint one section of each beak at a time. Using the No. 2 flat, base the upper half with CYM. Wipe brush on paper towel, sideload with BS, and then place in the shadows toward the head where the beak leaves the head. Wipe brush and blend where CYM and BS meet. Pick up a tiny amount of WW and add a highlight to top of beak. Pat to blend.
Step 3. Paint lower half of beak with CYM and place in the BS shadow in the same manner as for upper half of beak. Pat to blend. Referring to the color photo, paint a shadow along the center of the beak with BS and the chiseled edge of the No. 2 flat. This will separate the top of the beak from the bottom. Highlight middle of bottom beak with a tiny speck of WW. Pat to blend.
Step 4. Using the No. 2 flat, base red cap on top of each head with CRL. Brush back toward the back of the head in the direction the tiny feathers grow. Wipe brush, pick up a tiny amount of BU, and paint a shadow toward the beak and at the back of the head. Wipe brush again and, using the chiseled edge, blend these two shadow areas up toward the center of the head. The chisel blending will create tiny feather lines. If these feather lines seem too harsh, lightly mop with the flat surface of the brush in the direction the feathers are growing. Using the No. 2 flat, paint a small amount of CYM right in the middle of the head as a highlight. Wipe the brush on a paper towel. Using the chiseled edge of the brush, brush back and forth to blend. Add a tiny amount of WW for more highlight. Blend and mop to soften.
Step 5. Using the No. 2 flat, base white sections around each bird’s eye with TW. Wipe brush, and then pick up a small amount of PG to paint shadows (refer to color photo for placement). Using the chiseled edge of the brush, add shadow just above the eye and blend into the white area. Mop to soften.
Step 6. Using the No. 1 liner and LG, paint a tiny line along the eye for the eyelid (this line will be touching the eyeball). Outline the tiny lid with PG and paint eyeball IB. Clean the liner and pick up just a dot of TW to paint a highlight at 2 o’clock.
Step 7. The red stripe is painted the same as the cap in Step 4 above. The BU shadow will be near the eye and again at the back of the head.
Step 8. Base the white section just below the eye TW and paint a small shadow of PG near the beak. There is a tiny line of CRL just under this white area. A small amount of BU is painted on the beak and blended into the red. Refer to color photo for placement.
Step 9. The white section resembling a jaw is based with TW (no shadows are necessary here).
Step 10. Note: The back of the bird refers to the area between the tail and the shoulder. For the bird on the upper left, base back with WW, brushing toward the tail. Wipe brush, pick up a small amount of RS, and then brush toward the back of the tail.
Step 11. Using the No. 2 flat, base in both rumps with WW. Wipe brush and paint a tiny amount of RS around area where rump of bird on lower right rests on twig. For bird on left, paint RS under the tail wing. Blend the RS out into the WW.
Step 12. Double-load the No. 2 flat in BS and BU, brush blend on palette, and then base tail of bird on left. Wipe brush on a paper towel. Load with YO and flatten brush on the palette. Using the chiseled edge, paint a few lines to separate the feathers.
Step 13. The tail for the bird on the right is painted with the same brush mix of BS and BU blended on the palette. Notice how the tail remains very dark between the tail feathers. Paint in this dark area with BU. Lighten with YO on the edge of the feathers.
Step 14. Using the No. 4 flat, base each bird’s chest with WW. Wipe brush on paper towel and pick up RS to paint a shadow just under the upper WW area. Blend where the two colors meet by using the chiseled edge of the brush to pull color down into the chest. For the bird on the left, paint a small amount of RS behind leg. You may need to strengthen the shadow areas by adding touches of BS in a random manner.
Step 15. The wings for the bird on the left are painted first with BS. Using the chiseled edge of the No. 4 flat, divide sections of feathers with BU. Wipe brush and pick up a small amount of WW to highlight over the BS. Base white bars with TW and the No. 1 liner. Paint back BS, working your way toward the lighter area which has already been painted. This is the shoulder area. Paint wings for the bird on right in the same manner.
Step 16. The legs are painted using PG and the No. 1 liner. Highlight the tops of the claws with a tiny amount of TW. Try not to let the claws get too long—they will look much better after the twig is painted.
Step 17. The small black triangle located on each bird’s chest is painted with the No. 1 liner and IB.
Step 18. Brush mix BU, PG, and TW until you reach a greyish mix, and then paint in the three background twigs. The background twigs should have a lighter color value than the foreground twigs. Add a touch more TW to the brush mix and paint the pussy willows this paler grey. Shade using the straight background twig mix. Use the No. 4 round scumbler to tap in the pussy willows and the No. 1 liner to pull out the tiny twigs.
Step 19. Base foreground twigs with BU. Paint a TW highlight down the left edge of each twig. Blend where the two colors meet. Using the No. 4 round scumbler, tap in the pussy willows with WW. Wipe brush and tap in RS at the bottom and on the right edge of each bud. Wipe brush again and tap color up and out into the bud to blend. Repeat for all pussy willows. Allow entire surface to dry completely.
Finishing
Apply three to six coats of clear matte varnish, allowing time to dry between each application.
Leave a Comment