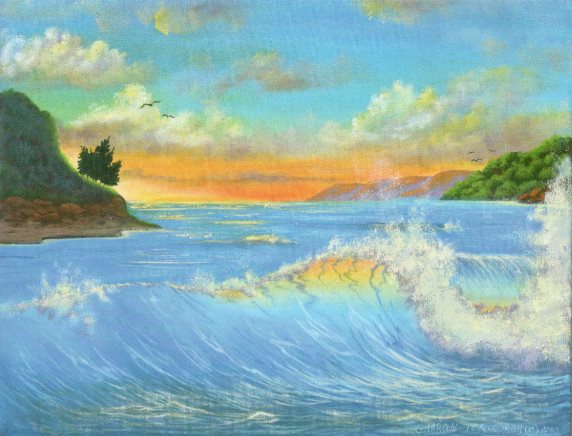
“I have a love affair with the ocean – there is nothing more beautiful than the sea! It can be sunrise or sunset, smooth sailing, or big splashing waves. The ocean always fascinates me with its mysterious undercurrents and dancing foam! Ever since I visited the Mediterranean, I have loved painting the beautiful colors of turquoise found in the area.”

Materials
-
Portrait canvas (14″x18″)
-
DecoArt Traditions Artist Acrylics: Aquamarine, Burnt Umber, Carbon Black, Cerulean Blue, Chrome Green Hue, Cobalt Blue, Dark Grey Value 3, Diarylide Yellow, Dioxazine Purple, English Red Oxide, Hansa Yellow, Hansa Yellow Light, Indian Yellow, Light Value Grey 8, Medium Beige, Medium Green, Medium Grey Value 6, Medium Red Rose, Perinone Orange, Phthalo Blue, Phthalo Green-Blue, Phthalo Green-Yellow, Pine Green, Raw Limber, Sapphire Blue, Teal Green, Titanium White, Ultramarine Blue, Warm White, Yellow Oxide
OR
-
DecoArt Americana Acrylics:
Arbor Green, Black Forest Green, Black Green, Buttermilk, Fawn, Indian Turquoise, Lamp Black, Marigold, Ocean Blue, Oxblood, Primary Yellow, Raw Umber, Snow (Titanium) White, Sour Apple, Taffy Cream, Tangelo Orange, Traditional Burnt Umber, Uniform Blue, Violet Haze -
Shining Feather Soft Glo Glazes*:
Primrose Purple, Sunrise Yellow, Sunset Orange -
Dynasty Faux Sable 1″ flat (Series 172); Black Gold #8 and #12 chisel blender (Series 206CB); Black Gold Miniatures #20/0 script liner (Series 206MSC); Decorator #8 dry brush (Series 200); 1/2″ deerfoot (Series 300); Micron #2/0 pointed flat (Series 266); Bristle #2 round (Series 1 350); Symmetry Mosaic #8, #10, and #12 bright (Series 1 760B); very stiff bristle brush
-
Winsor & Newton Painting Knife (no longer than 1-1/2”)
-
DecoArt Traditions Extender & Blending Medium; Satin Varnish
-
Masterson Art Products Sta-Wet Palette
-
Shining Feather Soft Scrub Brush Basin*
-
3M Scotch Magic Tape
-
Miscellaneous: cotton swabs, paper towels, ruler, stylus, tracing paper, transfer paper, water basin
-
Available from the artist.
Terminology
Note: To paint the ocean, you need to know the different parts of the ocean. You can see our full painting glossary.
Wave. Far out at sea, there is an energy source; it is the wind, crosscurrents, or many other forces of Mother Nature. These forces are transferred to the water. This energy source is like a large sphere just under the water’s surface; this sphere rolls along and creates swells far out at sea that eventually turn into waves (and then breakers on shore), which may have actually started hours earlier far out at sea.
Breaker. A breaker is the most amazing part of the wave. The breaker begins as a rolling sphere of energy beneath the surface of the ocean far out at sea. The sphere moves upward, creating a ground swell, until it cannot sustain its original shape; thus, it begins to fall forward, curling down onto the leading face of the breaker. When this happens, there is a tunnel of air beneath the rounded curl. The wave will finally collapse onto itself, creating foam. The noise you hear as it collapses is caused by the trapped air being forced out of the tunnel that is created by the water curling over. The face of the breaker is always concave; it actually curves away from the shoreline at this point. Understanding this movement is very important when painting large waves.
Whiteeaps. These usually occur at a distance; they are created when the wind whips the edges of the small irregular sea swells.
Foam trails. These are delicate lines of foam that have been swept up on the face of a wave.
Foam patterns. These are caused by breaking waves. After the wave breaks, the foam will settle on the surface of the water. This foam will be irregular and round holes will appear. As the foam separates, you will see more linear foam patterns on the surface of the water. These foam patterns eventually will thin out and gracefully curve up the face of the wave; they then become foam trails and look like delicate lace.
Foam spray. Tiny water droplets that are caused by a foam burst or wind whipping the edges of waves.
Ripples. A ripple is a small wave on the surface of the ocean.
Sparkles. These are reflected lights from the sun or moon that dance on top of the water.
Techniques
-
Glazing. Glazing is a technique most often associated with oil painting, but I have found a way to glaze with acrylics and get the same results. A glaze is a transparent application of washes, which are applied in successive layers over dry paint. It is much like placing layers of colored tissue paper on top of one another. Each glaze changes the look of the earlier ones, and the result is a rich, transparent, glowing look. The reason for this is that a glaze allows light to pass through it and be reflected back off the underlying color. The colors combine optically in the viewer’s eye and take on a resonance impossible to achieve by mixing them physically on the palette. Because most of the acrylic paints are not transparent, I developed Shining Feather Soft Glo Glazes, which are all transparent. I use glazing in most of my work for richer and more vibrant colors and to create more depth.
-
Scumbling. A “scumble” is a rough drybrush application of a light color over a darker color. Thinly apply a scumble application to create a delicate “veil” of color, which partially obscures the underlying color. Scumbling gives the look of texture. When scumbling, load the brush and then remove most of the paint before you begin.
Preparation
Note: Follow all manufacturers’ label instructions for proper product usage.
When mixing colors, refer to the Color Mixture/Color Conversion Chart.
The first mixtures/colors listed in the instructions are for Traditions Artist Acrylics, and the mixtures/ colors in brackets { } represent the corre-sponding Americana Acrylic color(s). The abbreviation “tch” means to add a touch of that color.
-
Trace and transfer the pattern onto the canvas.
-
Measure from the top of canvas to the top of the water to make sure the horizon is level. Apply a line of magic tape across the top of the water; press edges to seal well.
-
Prepare color mixtures and place on wet palette in small piles.
Mixture/Color Conversion Chart |
|
|---|---|
|
Note: The first mixtures listed are for Traditions Artist Acrylics, and the mixtures/colors in brackets represent the corresponding Americana Acrylic color(s). The abbreviation “tch” means to add a touch of that color. |
|
| DecoArt Traditions Artist Acrylics | DecoArt Americana Acrylics |
| Sky Mix 1: Titanium White + Cobalt Blue + Phthalo Blue (4:1:1) Sky Mix 2: Titanium White + Aquamarine + Cerulean Blue (2:1:1) Sky Mix 3: Warm White + tch Yellow Oxide Sky Mix 4: Titanium White + tch Diarylide Yellow |
(Ocean Blue} (Indian Turquoise} {Buttermilk} {Snow White + Taffy Cream (4:1)} |
| Cloud (Foam) Shadow: Sapphire Blue + Medium Grey Value 6 + Dioxazine Purple + Medium Red Rose (2:2:1:1) + tch Hansa Yellow Cloud (Foam) Highlight: Titanium White + tch Diarylide Yellow |
{Violet Haze + tch Primary Yellow} {Snow White + Taffy Cream (4:1)} |
| Water Mix: Warm White + Cobalt Blue + Phthalo Blue (4:1:1) | {Ocean Blue} |
| Sea Swell Shadow: Ultramarine Blue + Carbon Black + Dark Grey Value 3 + Medium Grey Value 6 (1:1:1:1) | {Uniform Blue} |
| Farthest Headlands Highlight (right side): Hansa Yellow + Perinone Orange (4:1) | {Uniform Blue} |
| Breaker Mix 1: Warm White + tch Yellow Oxide Breaker Mix 2: Titanium White + Aquamarine + Cerulean Blue (2:1:1) Breaker Mix 3: Ultramarine Blue + Carbon Black + Dark Grey Value 3 + Medium Grey Value 6 (1:1:1:1) |
{Buttermilk} {Indian Turquoise} {Uniform Blue} |
| Foliage Mix 1: Phthalo Green-Yellow + Teal Green (2:1) Foliage Mix 2: Medium Beige + Light Grey Value 8 + Chrome Green Hue + Phthalo Green-Yellow (2:1:1:1) Foliage Mix 3: Medium Green + Titanium White + Hansa Yellow Light (1:2:4) |
{Black Forest Green} {Arbor Green} {Sour Apple} |
| Rocks Highlight 1: English Red Oxide Rocks Highlight 2: Indian Yellow + Perinone Orange (1:1) |
{Oxblood} {Tangelo Orange} |
| Pine Tree Mix: Carbon Black + Phthalo Green-Blue + Pine Green (2:1:1) | {Black Green} |
| Burnt Umber | {Traditional Burnt Umber} |
| Carbon Black | {Lamp Black} |
| Hansa Yellow | {Marigold} |
| Medium Beige | {Fawn} |
Painting
Note: Use the Faux Sable 1″ flat to apply color to sky and water. Use the Symmetry Mosaic brushes for painting headlands, waves, and foam. Use the dry brush for foliage and the Bristle round for the foam. Use the #20/0 script liner for pine tree trunks, birds, and foam patterns. The deerfoot is used for the clouds and the #2/0 pointed flat for pine trees. Create foam trails with the chisel blenders.
Extender & Blending Medium will be referred to as “Extender” throughout the instructions.
Sky
-
Use a large brush to apply a light application of Extender over the sky area. Base the top of the sky with Sky Mix 1, covering about a third of the sky. Apply Sky Mix 2 to the middle third of the sky, blending where the colors meet. Apply Sky Mix 3 to the lower portion of the sky and blend. Let dry.
-
Load the heel of the deerfoot with Cloud (Foam) Shadow and the tip in Titanium White. Use a swirling motion to lightly scrub in the clouds. Keep the shapes different from one another. We want different shapes of clouds —not cotton ball shapes that look alike. Paint the farthest clouds near the horizon with only Cloud (Foam) Shadow
-
Base the sky area behind the pine trees (by sun) with Sky Mix 4. Blend into the undercolor.

Headlands
-
Base the purple headlands in the distance with Cloud (Foam) Shadow + tch Hansa Yellow. Add highlights with Farthest Headlands Highlight mix.
-
Base the headland that is closer (on right side) with Burnt Umber + Titanium White (1:1). Use the #8 dry brush to tap in Foliage Mix 1. When dry, tap in Foliage Mix 2, allowing the base color to show through. Applv Foliage Mix 3, keeping it toward the edges and top.
-
Remove tape from horizon. Base the rocky area in front (on right side) with Burnt Umber + tch of Carbon Black. Add highlights to the rocks with Rocks Highlight 1. When dry, add Rocks Highlight 2. Allow some of the undercolors to remain visible on the left side of each rock.
-
Base the headland area on the left with Raw Umber.
-
Use the dry brush to tap headland foliage with Foliage Mix 1 and Foliage Mix 2. On the very edge of the foliage area (under the pine trees), lightly tap in a small amount of Foliage Mix 3.
-
Base the front sand area with Medium Beige. Add a shadow under the sand with Burnt Umber.
-
Base the rocks with Burnt Umber + tch Carbon Black. Add highlights with Medium Beige + tch Titanium White.
-
Use the script liner with Pine Tree Mix to line tree trunks. Fill in the tree with Pine Tree Mix using the Micron pointed flat.
Water
-
Base the water behind the big wave with the Water Mix.
-
Scumble Breaker Mix 2 on the horizon, center of the water, and area in front of headlands on the right side. Keep the application stronger along the horizon.
-
Apply the small waves behind the large breaker with Breaker Mix 3; on top of these, add Cloud (Foam) Highlight. Add foam around the headlands with Cloud (Foam) Highlight.
-
Use the painting knife with Cloud (Foam) Highlight to apply sparkles behind the headland on the left where the sun is hitting the water.
Breakers
Note: It is very important to blend this area well. You may want practice on scrap paper first.

-
Breaker. Apply a coat of Extender to front of wave. Apply Breaker Mix 1 to the transparent area at the top. Apply Water Mix to the area next to this, then apply Breaker Mix 2, and finally apply Breaker Mix 3 to the bottom. Work from the top to the bottom, blending the edges of the colors. Wipe the brush frequently to remove extra paint.
-
Foam trails. Create the large foam trails on the face of the wave with Breaker Mix 3. Slightly curve the strokes to follow the curvature of the wave —a chisel blender works best for this.
-
Foam patterns. Add foam patterns using Cloud (Foam) Highlight.
-
Curl. Create the “curl” of the wave with the same colors used for the breaker (step 1), except reverse the order of the colors —the transparent color is at the bottom with Breaker Mix 3 on the top. Scumble different-length strokes of Breaker Mix 3 over the upper three-quarters of the curl, pulling down and following the curve of the falling water. Repeat with Cloud (Foam) Highlight.
-
Foam. Use the Bristle #2 round with Cloud (Foam) Shadow to scrub in the foam, starting in the middle and quickly scrubbing back and forth using very tiny movements. Keep the edges of the foam “broken” by tapping them in with the tip of the brush.
Clean and dry the Bristle #2 round. Scrub Cloud (Foam) Highlight over the shadow areas in the same manner as for the shadow foam color. Allow random areas of shadow foam to show through. Tap in the tops and edges to keep them very ragged. -
Spray. Thin Cloud (Foam) Highlight with water to an inky consistency. Use a very stiff bristle brush and your finger to flip the paint off the brush and onto the foam areas to create a spray concentrated mostly on the tips of the foam.
-
Mist. Scrub a very thin veil of Titanium White in a few areas over the top of the foam to create a misty effect.
-
Shade foam. Scrub a small amount of Breaker Mix 2 in a few places on the foam shadow areas.
-
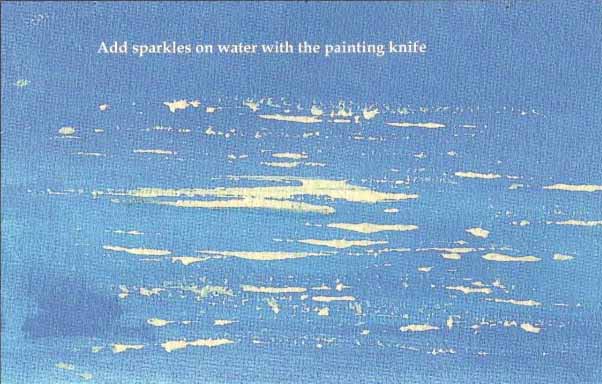
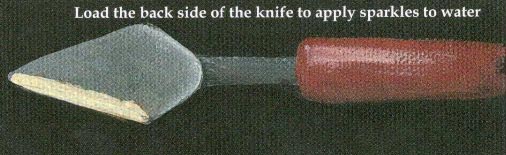
Sparkles on the water. Load the painting knife with the Cloud (Foam) Highlight. Hold the knife at a 45° angle (barely touching the top of the water), and move the knife back and forth. Start at the back and work forward, reloading the knife only after you have used up paint.
Note: If you load too much paint on the knife, it will create big blobs; if you don’t use enough paint, it won’t come off the knife. Practice a few times before going to your canvas. However, if it still does not look good, remove the sparkles with a cotton swab (or a brush) and some water before they dry, and reapply. -
Create the birds with Carbon Black and highlight the closer ones with Sky Mix 4.
Apply glazer
Note: You can stop at this point, but your results will not be the same as the example. Glazing is an important element in this painting. If necessary, thin the glazes with water to make them a bit softer. Each application must be dry before applying another.
-
Apply a glaze of Sunrise Yellow to yellow areas of the sky, some white areas of clouds (not all), farthest headland, foliage and rocks on right side, and light green area of foliage behind the pine trees. Don’t apply a glaze to the sun area behind the headlands on the left. That area will remain the Cloud (Foam) Highlight color.
-
Apply a glaze of Sunset Orange to the middle of the sky, behind the farthest headlands, and to the rocks on the right side. Apply a much-diluted glaze to the shadows of the clouds.
-
Glaze the foliage in the shade on the left side with Primrose Purple.
-
Apply a thin coat of Sunrise Yellow glaze to the transparent areas of the “breaker” and “roll,” pulling slightly into the Breaker Mix 2 area. Dry completely. Add a glaze of Sunset Orange only on the top of this color on the breaker and below it on the roll.
Finishing
When dry, apply a coat of Satin Varnish to the canvas.
Leave a Comment